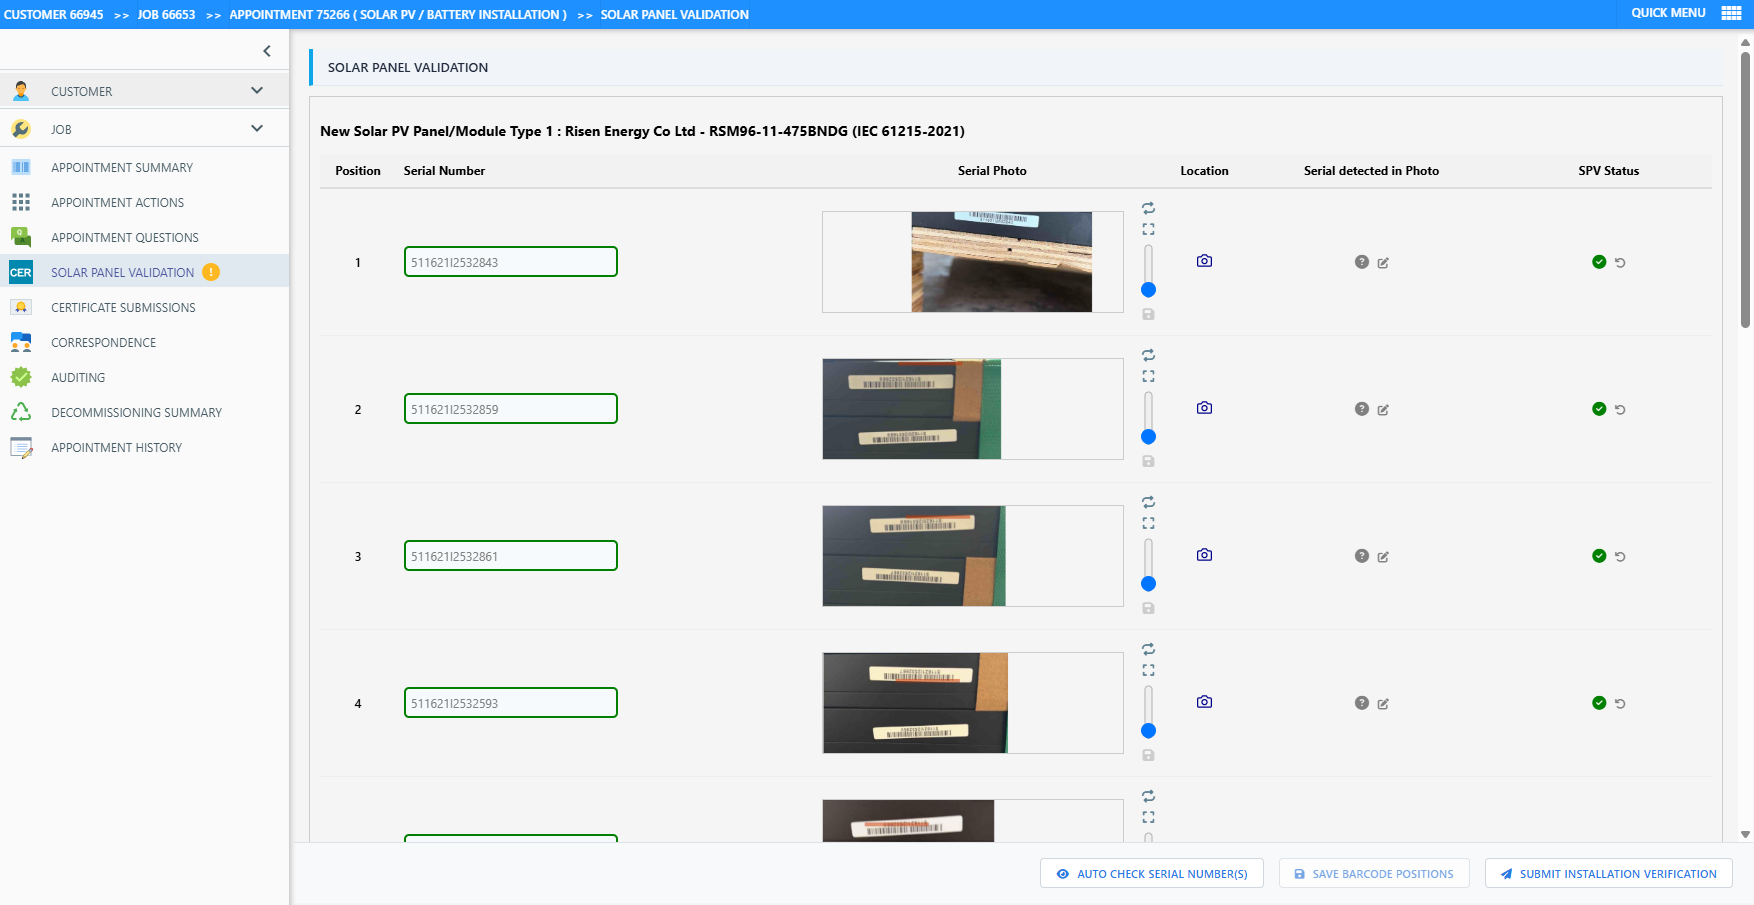
The appointment Solar Panel Validation screen lets an operator complete Solar Panel Validation (SPV) from the back end - without the field worker having to do it in Runabout. From this screen you can:
- Review every panel serial number captured on the appointment, together with its serial photo and GPS location.
- Check that the serial number is actually visible in the photo (automatic text detection).
- Reset a validation result so a serial can be re-validated.
- Validate each serial with the verification service provider (Panel Validation / Product Verification).
- Submit the final Installation Verification once every panel has passed.
Where to find it
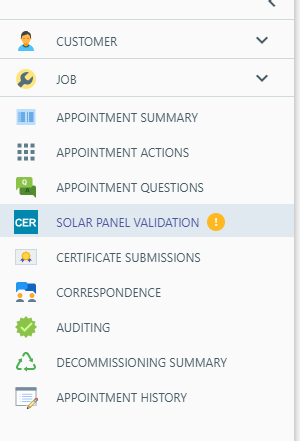
- Select an appointment.
- Select Solar Panel Validation in the right hand side navigation menu.
The tab only appears when all of the following are true:
- The SPV (CER) integration is enabled for the program.
- The integration’s Panel Product Category setting is configured.
- The appointment actually contains solar panel products (serial number scan questions with products in the configured panel category).
The tab also carries a status badge so you can see the SPV state without opening the screen:
- A red number - how many panels have not yet passed Panel Validation.
- An amber “!” - every panel has passed, but Installation Verification has not been submitted yet.
- No badge - Installation Verification is complete (or there is nothing to validate).
The two verifications (plus one helper check)
It is important to understand the three checks on this screen, because only two of them are mandatory:
| Check | Column / button | What it does | Required? |
|---|---|---|---|
| Panel Validation (Product Verification) | SPV Status column, Validate Panel Serial Number(s) button | Sends the serial number (and photo) to the verification service provider (VSP) to confirm the serial is a genuine unit of the selected product | Yes - every serial must pass before Installation Verification can be submitted |
| Installation Verification | Submit Installation Verification button | Submits the full installation (panels, installer, retailer, address) to the VSP as the final SPV step | Yes - this is the final submission |
| Serial detected in Photo | Serial detected in Photo column, Auto check serial number(s) button | Uses AWS text detection (Rekognition) to confirm the recorded serial number is actually readable in the captured photo | No - it is an aid for the operator and is deliberately not a prerequisite for submission |
Screen layout
Panels are grouped into blocks, one per product / block instance (e.g. PV Module Type 1 : JA Solar JAM60S10). Each row in a block is one serial:
| Column | Meaning |
|---|---|
| Position | Row number of the serial within the block |
| Serial Number | The recorded serial (read-only). A green border means it passed Panel Validation, a red border means it failed. Failure messages from the VSP appear directly underneath. An amber Edited badge marks a serial that was edited or manually added through the back office - see Back-office serial changes disable SPV |
| Serial Photo | A small viewport framed on the barcode region of the captured photo. Drag to pan, mouse wheel or slider to zoom, rotate and reset controls beside it |
| Location | Opens the photo and its capture location on a map. A warning icon appears when the photo was captured away from the property address |
| Serial detected in Photo | Result of the text detection check: green tick = detected automatically, red cross = not detected, grey question mark = not yet checked. An orange tick marks a historical manual verification (a feature that has since been removed); its undo icon withdraws it |
| SPV Status | Panel Validation result: green tick = passed, red cross = failed, grey question mark = not validated. An undo icon resets the result |
The footer holds the bulk actions:
- Auto check serial number(s) - runs the photo text detection over every unchecked serial, one at a time.
- Save Barcode Positions - saves any photo framing (zoom / rotation / position) you have changed.
- Validate Panel Serial Number(s) - sends every failed / not-validated serial to the VSP, one at a time.
- Submit Installation Verification - only appears once every serial has passed Panel Validation.

Before you start: SPV must be enabled on the appointment
Panel Validation can only run when the appointment’s SPV enable question (configured on the integration, normally “Do you want to validate the panels using SPV?”) has been answered Yes.
If it has not, a yellow banner is shown and the Validate Panel Serial Number(s) button is disabled:

If the question exists on the appointment (i.e. the field worker answered it, but answered No), the banner includes an Enable Solar Panel Validation button that flips the answer to Yes for you. The change is written to the appointment’s question answers and recorded in the appointment history.
Back-office serial changes disable SPV
CER requires the serial number and its photo to be captured together at the time of scanning in the field. Editing a serial number - or adding one by typing it in - breaks that chain of evidence and violates the terms of the Solar Panel Validation agreement, so ASAP treats any such serial as permanently disqualified from SPV:
- Serial numbers cannot be changed from this screen at all.
- Editing an existing serial, or manually adding one, on the appointment questions screen is still possible, but the operator is warned as they leave the field and must explicitly confirm “Save and disable Solar Panel Validation” before the save goes ahead. The change also resets the serial’s Panel Validation and photo detection results.
- A serial changed this way is flagged and shown with an amber Edited badge on this screen.
While any serial on the appointment carries the Edited flag:
- A red banner explains that Solar Panel Validation is not available for the appointment.
- Validate Panel Serial Number(s) and Submit Installation Verification are disabled, and the server refuses both requests as well.
- The appointment must be submitted through the standard (non-SPV) process instead.
The flag cannot be cleared from the back office. The only way to restore SPV eligibility is a genuine field recapture through Runabout, which replaces the serial records with freshly captured serial and photo pairs.
Checking the serial photos
Framing the barcode
Each serial photo is shown in a viewport that is automatically framed on the barcode/serial region when the position is known. You can adjust the framing:
- Drag the image to pan.
- Mouse wheel over the image, or the vertical slider, to zoom (the wheel zooms the photo, not the page).
- Rotate 90° icon to turn a sideways or upside-down label.
- Reset view icon to fit the whole photo back in the frame.
Changed framing is not saved until you click the row’s save icon or the footer Save Barcode Positions button (both stay greyed out until something has changed).
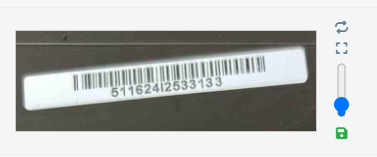
Photo and location details
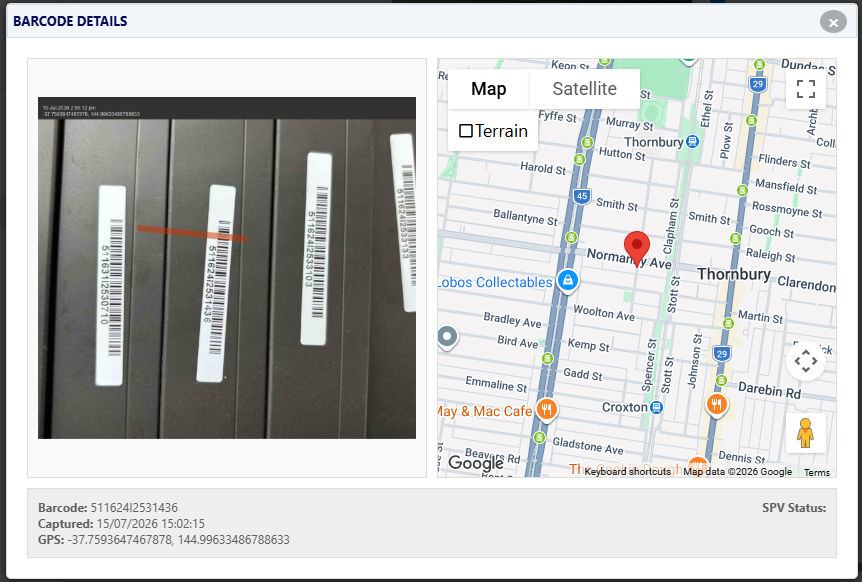
The Location column icon opens a dialog showing the full photo (with zoom / rotate tools) beside a map of where it was captured, plus the capture time, GPS coordinates and current SPV status.
A warning icon appears next to it when the photo’s GPS position is more than a short distance from the property address; hover over it to see the actual distance. Use this to spot photos taken at the wrong site (e.g. in the warehouse).
Verifying the serial is in the photo
Automatic check
Click Auto check serial number(s) in the footer to run text detection over every serial that has not yet been checked. Serials are processed one at a time; the row being checked is highlighted and scrolled into view.
- Found - the column shows a green tick, and the viewport is automatically re-framed (and saved) on the detected text.
- Not found - the column shows a red cross. The detected text is listed in the result dialog so you can see what was actually readable in the photo.
The match is forgiving of common OCR confusions (letter O vs zero, letter l/I vs one), so minor font ambiguities on the label will still match.
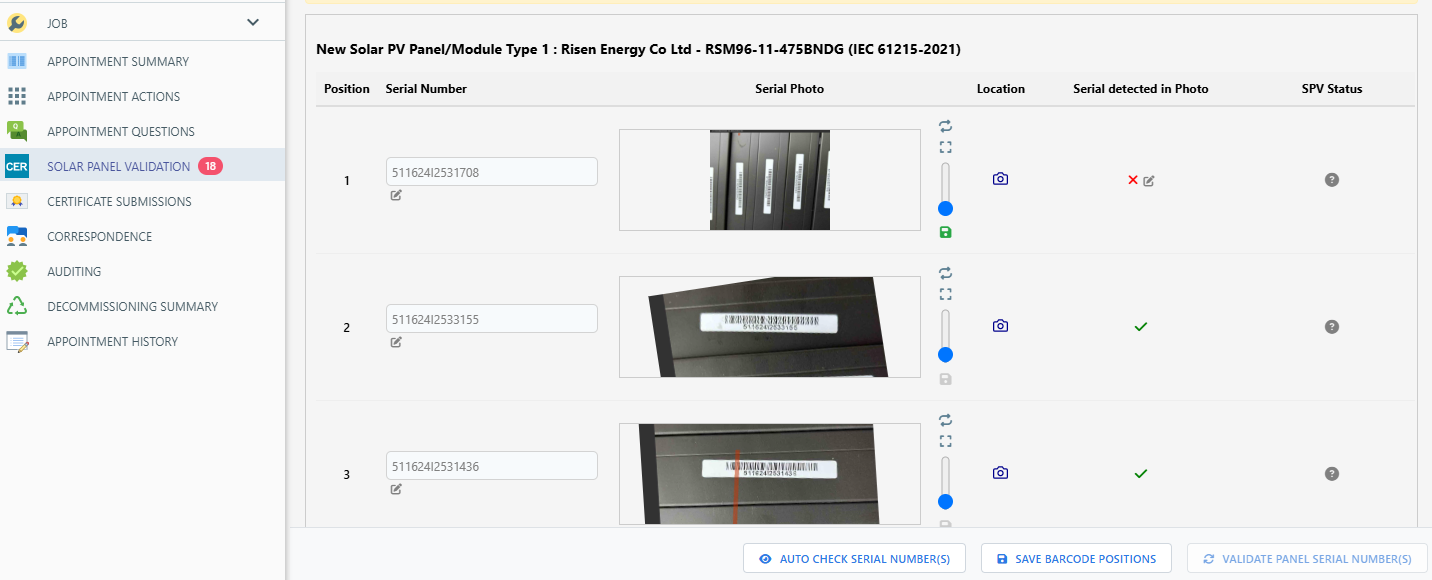
If the serial is not detected
If the automatic check cannot find the recorded serial in the photo, the column shows a red cross. There is no manual override: manually vouching that a serial appears in its photo (or correcting the serial to match the photo) would violate the CER SPV terms, so the feature was removed. If the capture is genuinely wrong - unreadable photo, wrong serial recorded, or photos attached to the wrong panels - the affected panels must be recaptured through Runabout.
Remember the photo check is an operator aid only - a red cross here does not block Panel Validation or Installation Verification.
Validating panel serial numbers (Panel Validation)
Click Validate Panel Serial Number(s) in the footer. Every serial that is failed or not yet validated is sent to the verification service provider one at a time; the row being validated is highlighted and scrolled into view.
For each serial:
- Pass - green border on the serial, green tick in SPV Status. The serial is now permanently locked - it cannot be edited or deleted anywhere in the back office.
- Fail - red border and red cross, with the VSP’s reason shown directly under the serial number (e.g. serial not found for that manufacturer/model). The failure is recorded against the serial.
As results come in, ASAP keeps the appointment’s CER submission records and status in sync automatically:
- All serials passed → appointment CER sub-status becomes CPV (Panel Validation finished).
- Any serial failed / unvalidated → CPVF (Panel Validation failed).
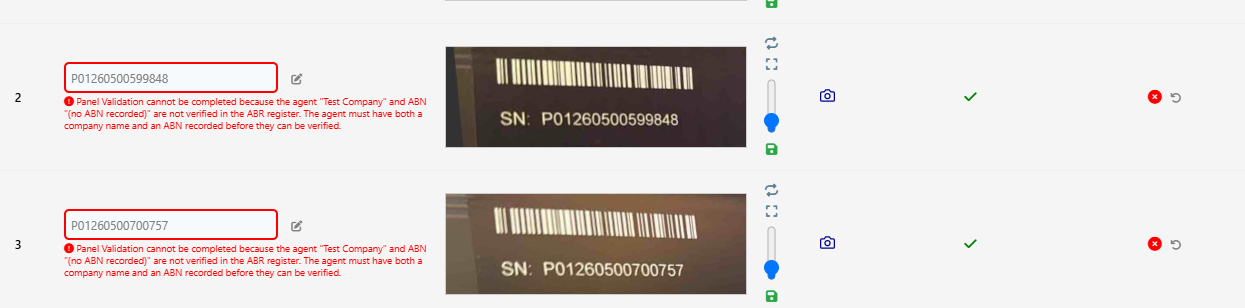
Resetting a validation result
The undo icon in the SPV Status column resets a passed or failed serial back to Not Validated (after a confirmation). Use this when a serial passed against the wrong details, or to clear a stale failure, so the serial can be re-validated. The reset is recorded in the appointment history. Note that resetting does not make the serial correctable - a wrong serial must be recaptured through Runabout.
Submitting Installation Verification
Once every serial on the appointment shows a green tick in SPV Status, the Submit Installation Verification button appears in the footer. Clicking it sends the complete installation to the VSP: the panels (with their serial photos), the installer (field worker) details, the retailer (the job’s agent) and the verified installation address.
- Success - a green Installation Verification Passed badge replaces the button, the appointment CER sub-status becomes CIV, and the whole screen locks (see below).
- Failure - the errors returned by the VSP are listed in a dialog (one row per problem), and the sub-status becomes CIVF. Fix the reported problems and submit again.
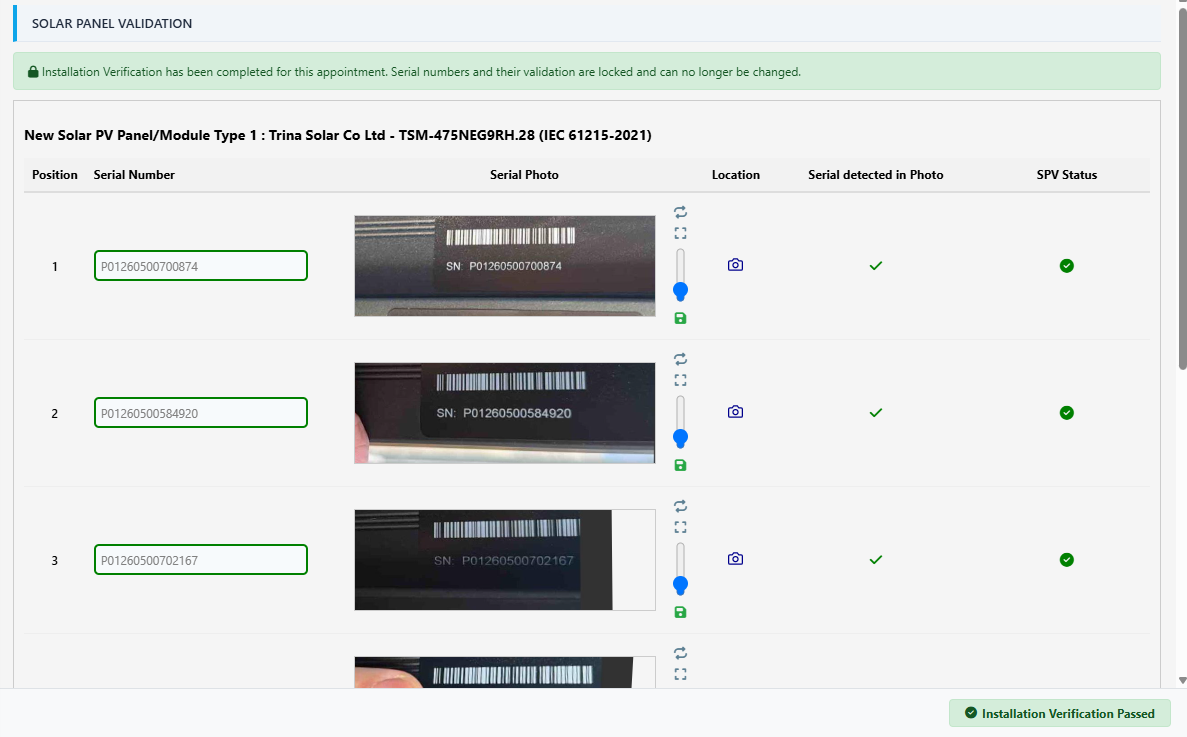
Gating rules - what blocks submission
Both Panel Validation and Installation Verification are gated server-side. The table below lists every rule and how to fix a block:
| Rule | Applies to | Error you will see | How to resolve |
|---|---|---|---|
| SPV must be enabled on the appointment (enable question answered Yes) | Panel Validation and Installation Verification | “Solar Panel Validation has not been enabled for this appointment” | Use the Enable Solar Panel Validation button in the banner (only offered when the question exists on the appointment) |
| No serial may have been edited or manually added in the back office | Panel Validation and Installation Verification | “…edited or manually entered in the back office, so it cannot be submitted…” | Recapture the affected panels through Runabout, or submit the appointment through the standard (non-SPV) process. See Back-office serial changes disable SPV |
| The product must be configured for SPV | Panel Validation | “Solar Panel Validation is not available for this product” or “This product has more than one possible supplier…” | Configure the product’s manufacturer/supplier on the Solar Panel Validation tab of the Product Register. Products with an ambiguous supplier must have one selected explicitly. This is also checked on page load - a red banner on the block warns you up front |
| The job’s agent must be ABR-verified | Panel Validation and Installation Verification | “…the agent … and ABN … are not verified in the ABR register” | The agent recorded on the job must have a company name and ABN, and the ABN must resolve in the Australian Business Register to an entity whose name matches the agent name. Correct the agent’s name/ABN in the Agent register (a corrected agent takes effect immediately) |
| The agent’s ABN must pass the checksum | Installation Verification | “Retailer ABN not passed Checksum and is invalid” | Fix the ABN recorded against the agent |
| Every panel must have passed Panel Validation | Installation Verification | “All panels must pass Product Verification before you can submit for Installation Verification” | Validate the failed / unverified panels first. The button is also hidden client-side until all panels pass |
| The customer address must be verified with GPS coordinates | Installation Verification | “This Customer Address has not been Verified and/or is Missing a Latitude and Longitude…” | Verify the customer’s property address so it has a latitude/longitude before submitting |
| The appointment’s field worker must exist and be active | Installation Verification | “Field Worker details not found or inactive” | The appointment must have an active field worker assigned (their CEC installer accreditation is included in the submission) |
| Installation Verification already completed | Everything | “Installation Verification has been completed for this appointment…” | Nothing to resolve - the screen is locked (see below) |
Locking after Installation Verification
Once Installation Verification has completed for the appointment, the screen becomes read-only and a green banner is shown:

While locked you can still open photos and location details, but every change is blocked - both in the UI and again on the server:
- No validation resets.
- No re-running Panel Validation or the photo text detection.
- No changing photo framing, and no toggling the SPV enable question.
There is no unlock from this screen - the verification has already been lodged with the VSP.
Status reference
The appointment’s CER status appears on the appointment and drives the tab badge:
| CER sub-status | Meaning |
|---|---|
| CPV | Panel Validation finished - every serial passed |
| CPVF | Panel Validation failed - one or more serials failed or are unvalidated |
| CIV | Installation Verification finished (screen locked) |
| CIVF | Installation Verification failed - fix the reported errors and resubmit |
| CAF / CCP | Certificates claimed (fully / partially) - post-verification claim states |
Every status change, validation reset and SPV enable/disable is written to the appointment history (look for CER-SPV Status Changed, SPV Validation Reset and SPV Enabled Changed entries). Older appointments may also carry historical Serial Number Update and SPV Serial Swapped entries from before back-office serial changes were removed.
Quirks and special notes
- The photo check is optional. Serial detected in Photo never blocks Installation Verification. Green SPV Status ticks are all that is required. Treat the photo check as your data quality tool, not a compliance gate.
- Failures are recorded, not discarded. A failed Panel Validation attempt is stored against the serial with the VSP’s reason, and moves the appointment to CPVF. This is visible to anyone opening the screen later.
- A passed serial is frozen - permanently. Once a serial passes Panel Validation it can never be edited or deleted from the back office, on this screen or the appointment questions screen. Resetting its validation with the undo icon only returns it to Not Validated for re-validation (which puts the appointment back to CPVF until it passes again).
- Serials with no photo. If a field worker typed a serial without capturing a photo, the row shows No Image. Panel Validation can still pass (the photo is only attached when the VSP endpoint wants one), but the automatic photo check will report an error for it.
- Partial resubmission is safe. Blocks that already completed Installation Verification (or were claimed) are skipped when you submit again - only outstanding blocks are sent.
- Validating here self-heals the appointment. Validation run from this screen rebuilds the appointment’s CER submission records the same way a Runabout sync would, so appointments completed entirely from the back end end up in the same state as field-verified ones.
- Rescheduled / cloned jobs. Serial records are tied to the appointment; if the serials were captured under a different job id than the appointment now has (e.g. after a clone), the submission still follows the serials, so the panels on screen are the panels submitted.
- Distance warning. The location warning icon triggers when the photo’s GPS position is roughly more than 20 metres from the property address; the hover text shows the measured distance in kilometres.
- One at a time. The bulk Validate and Auto check buttons intentionally process serials sequentially (each VSP/detection call completes before the next starts), so large systems take a little while - the highlighted row shows progress.
- Two operators, one appointment. All guards are re-checked server-side, so a second operator cannot reset or validate a serial after another operator submitted Installation Verification - the second action fails with a message asking to reload.
Related pages
- Setting up Solar Panel Validation - integration and question configuration
- Completing an SPV Appointment on Runabout - the field worker flow
- Appointment Questions - where the SPV enable question and serial scans live
- Appointment History - audit trail of all SPV actions