Overview
Xero is an online accounting platform. The Dataforce ASAP Xero integration sends your fieldworker and agent invoices (Recipient Created Tax Invoices, or RCTIs) to Xero as bills the moment they are finalised, so your accounts payable team never has to re-key them.
With the integration enabled:
- Finalising a fieldworker or agent invoice in Dataforce ASAP creates a matching bill in Xero against the fieldworker’s or agent’s contact. The bill has one line per invoice line, coded to the account, tax rate, item and tracking options you have configured in Dataforce ASAP.
- Reversing the invoice in Dataforce ASAP removes the bill from Xero: a draft bill is deleted, an approved bill is voided.
- The Invoice View tab in Dataforce ASAP shows the bill’s current status in Xero (Draft, Authorised or Voided), with a link that opens the bill in Xero.
Bills are created in Xero as Draft, so your accounts team still reviews and approves them in Xero before payment.
The integration is a program level integration: one Xero organisation is connected per Dataforce ASAP program, and every fieldworker and agent invoice in the program goes to that organisation.
How it works
- An operator finalises an invoice on the Invoice View tab (see Invoice Finalize and Invoice Reverse).
- Dataforce ASAP sends an invoice created event to the Dataforce integration service.
- The integration service reads the finalised invoice from Dataforce ASAP: the contact name, the invoice number and date, and each line with its quantity, rate, Accounting Code and tax code, Item Code and Tracking Options.
- It finds the matching contact in Xero by name (creating the contact if none exists) and creates the bill, using the Dataforce ASAP invoice number as the bill reference.
- The Xero status is shown on the invoice in Dataforce ASAP, and any problem is recorded in the Integration Event Log.
The whole process normally takes well under a minute.
Before you start
Have the following ready before you begin:
- A Xero login for the organisation you want to connect, with a Xero user role that is allowed to connect apps (Standard or Adviser).
- Your chart of accounts. Decide which Xero accounts fieldworker and agent payments should be coded to. These are normally Expense accounts, for example a Subcontractor Payments account.
- Item codes and tracking categories (optional). If your Xero organisation uses items or tracking categories for reporting, have the exact codes and names to hand.
- Program Administrator access in Dataforce ASAP, plus the Admin - Account Codes and Admin - Invoice Line Items permissions.
- GST status set correctly on every fieldworker and agent. The GST Registered checkbox on the Field Worker and Agent records controls whether GST is added to their invoice lines.
Step 1 - Create your Accounting Codes
Accounting Codes are the Dataforce ASAP copy of the Xero accounts you will code bill lines to. Each one carries the Xero account code and the tax code that applies to it.
- Navigate to (Configuration icon) Invoices Accounting codes
- Click Add Accounting Code and enter the Account Type, the Xero Accounting Code, a Description and the Tax Code.
- Repeat for every Xero account you will use.
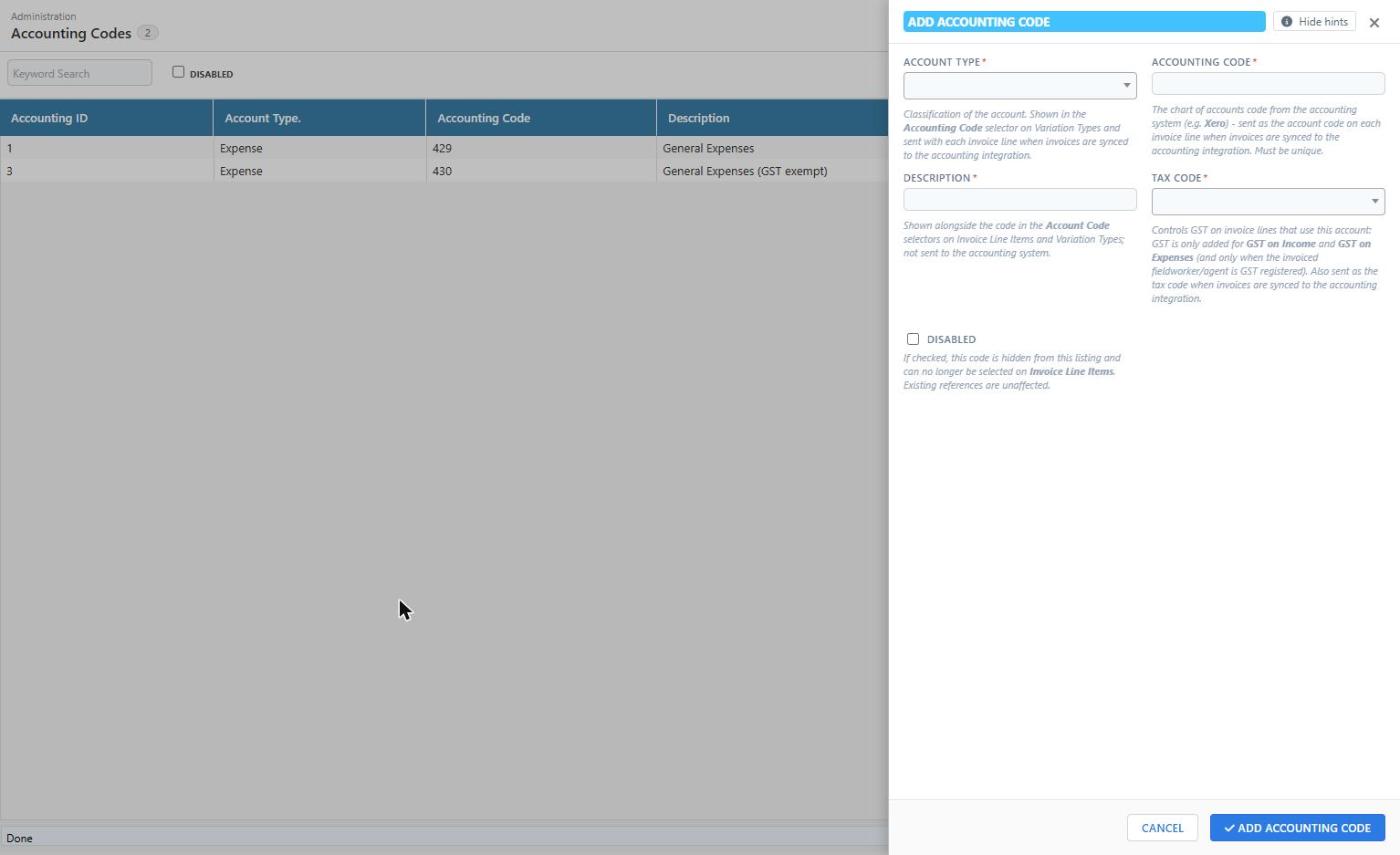
The Accounting Code must be the code of an account in the Xero chart of accounts (Accounting Advanced Chart of accounts in Xero), and the Tax Code names match Xero’s standard Australian tax rates. Full details, including how the tax code drives GST on the invoice, are on the Accounting Codes page.
Step 2 - (Optional) Create Item Codes
If you code purchases to items in Xero (Business Products and services), create a Dataforce ASAP Item Code for each Xero item you want to appear on bills.
- Navigate to (Configuration icon) Invoices Accounting Item codes
- Click Add Item Code and enter the Xero item Code and a name.
See Accounting Item Codes. Skip this step if you do not use items in Xero.
Step 3 - (Optional) Create Tracking Categories and Options
If your Xero organisation reports by tracking categories (Accounting Advanced Tracking categories), mirror them in Dataforce ASAP so bill lines are tagged automatically.
- Navigate to (Configuration icon) Invoices Accounting Tracking Categories and add each Xero tracking category by name.
- Navigate to (Configuration icon) Invoices Accounting Tracking Options and add the options of each category by name.
The names must match Xero exactly. See Accounting Tracking Categories and Accounting Tracking Options. Skip this step if you do not use tracking in Xero.
Step 4 - Code your Invoice Line Items and Variation Types
Every line of a fieldworker or agent invoice comes from an Invoice Line Item or an invoice variation. Each needs an Accounting Code so the bill line lands in the right Xero account.
Invoice Line Items
- Navigate to (Configuration icon) Invoices Invoice Line Items
- Filter the list by each of your fieldworker and agent Invoice Types in turn.
- Open each line item and, in the General section, set the Account Code, and if you use them the Item Code and Tracking Options. Click Update Invoice Line Item.
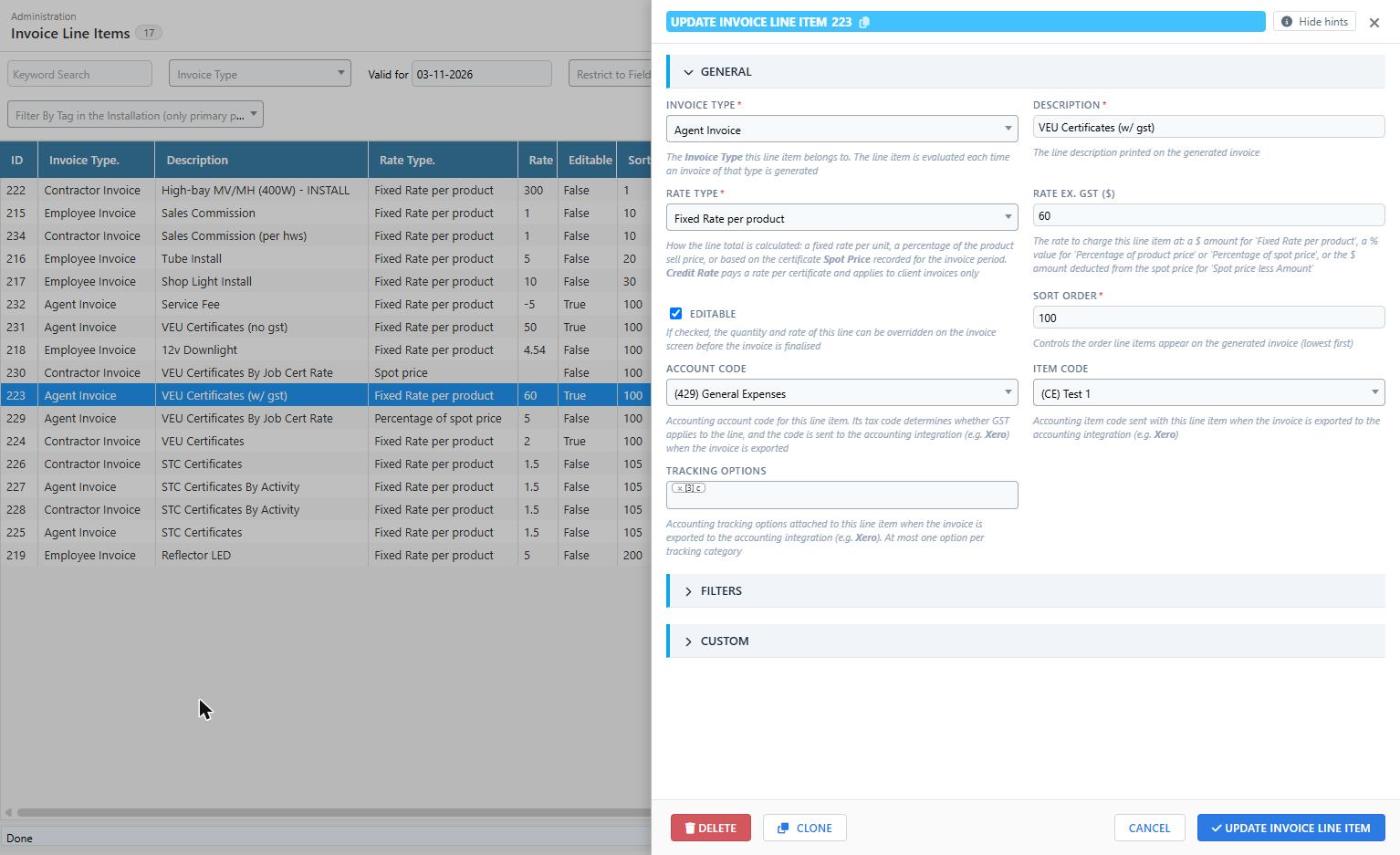
The Account Code and Item Code columns in the list show None for any line item that still needs attention.
Invoice Variation Types
Variations raised through Tasks Invoices Invoice Variations take their account from their Variation Type.
- Navigate to (Configuration icon) Invoices Invoice Variations Codes
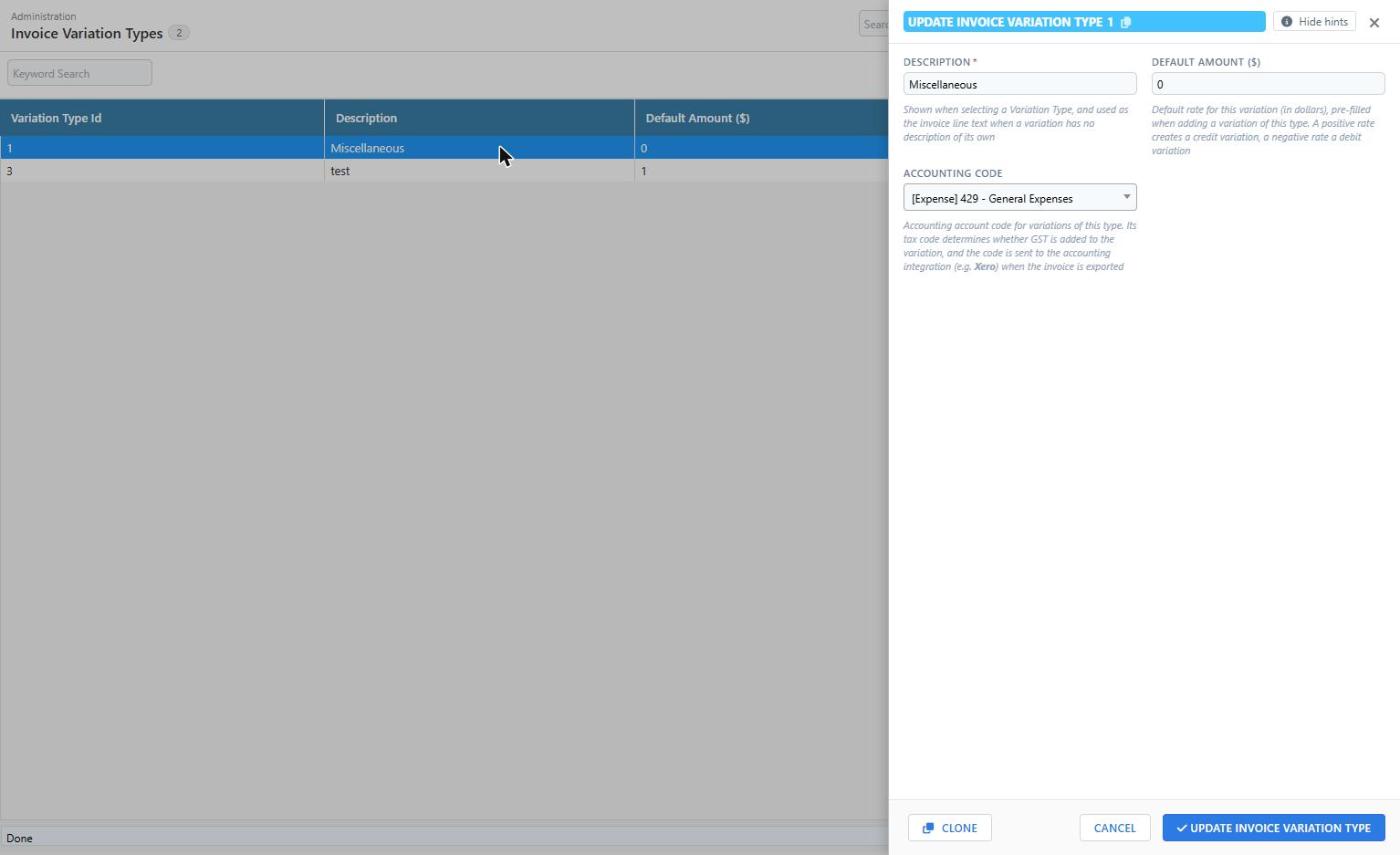
- Open each variation type, set its Accounting Code and click Update Invoice Variation Type.
Step 5 - Match your contacts to Xero
The integration finds the Xero contact for each bill by name. By default the name sent to Xero is:
- for a fieldworker, the Company name on the Field Worker record, or the fieldworker’s first name and surname if no company is recorded;
- for an agent, the Agent Company Name on the Agent record.
If that name does not exactly match the contact in Xero, the integration creates a new contact with the Dataforce ASAP name, which leads to duplicate contacts in Xero. To avoid this, give Dataforce ASAP the exact Xero contact name through an attribute:
-
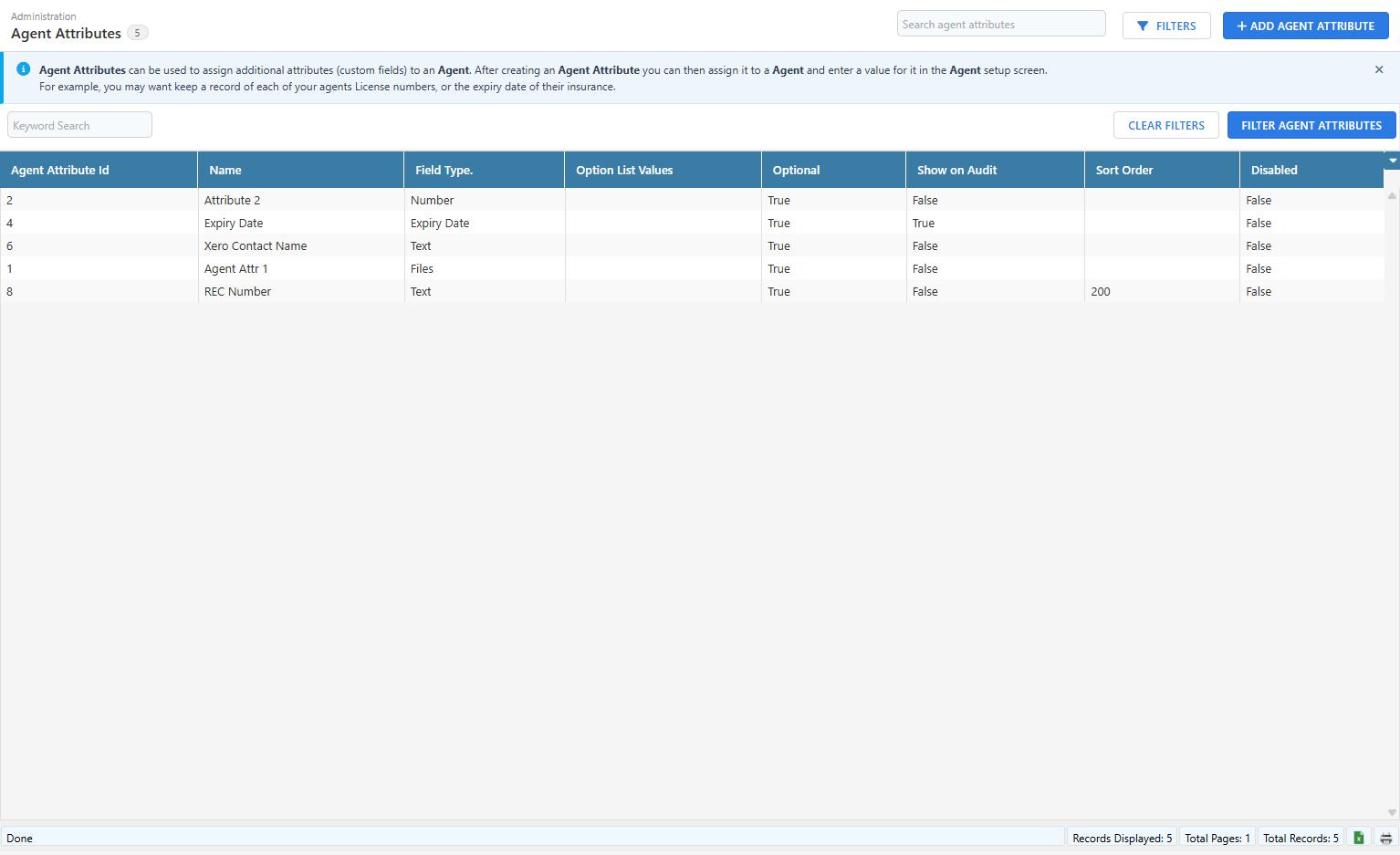
Create an Agent Attribute with a Text field type, for example Xero Contact Name ( Admin Agents Agent Attributes). Make it optional.
- Create a Field Worker Attribute in the same way ( Admin Field Workers Field Worker Attributes).
-
On each Agent and Field Worker record whose Xero contact name differs from their Dataforce ASAP name, enter the exact Xero contact name in the new attribute and save the record. The attribute appears in the Agent Attributes section of the Agent Details tab, and in the attributes section of the Field Worker record.
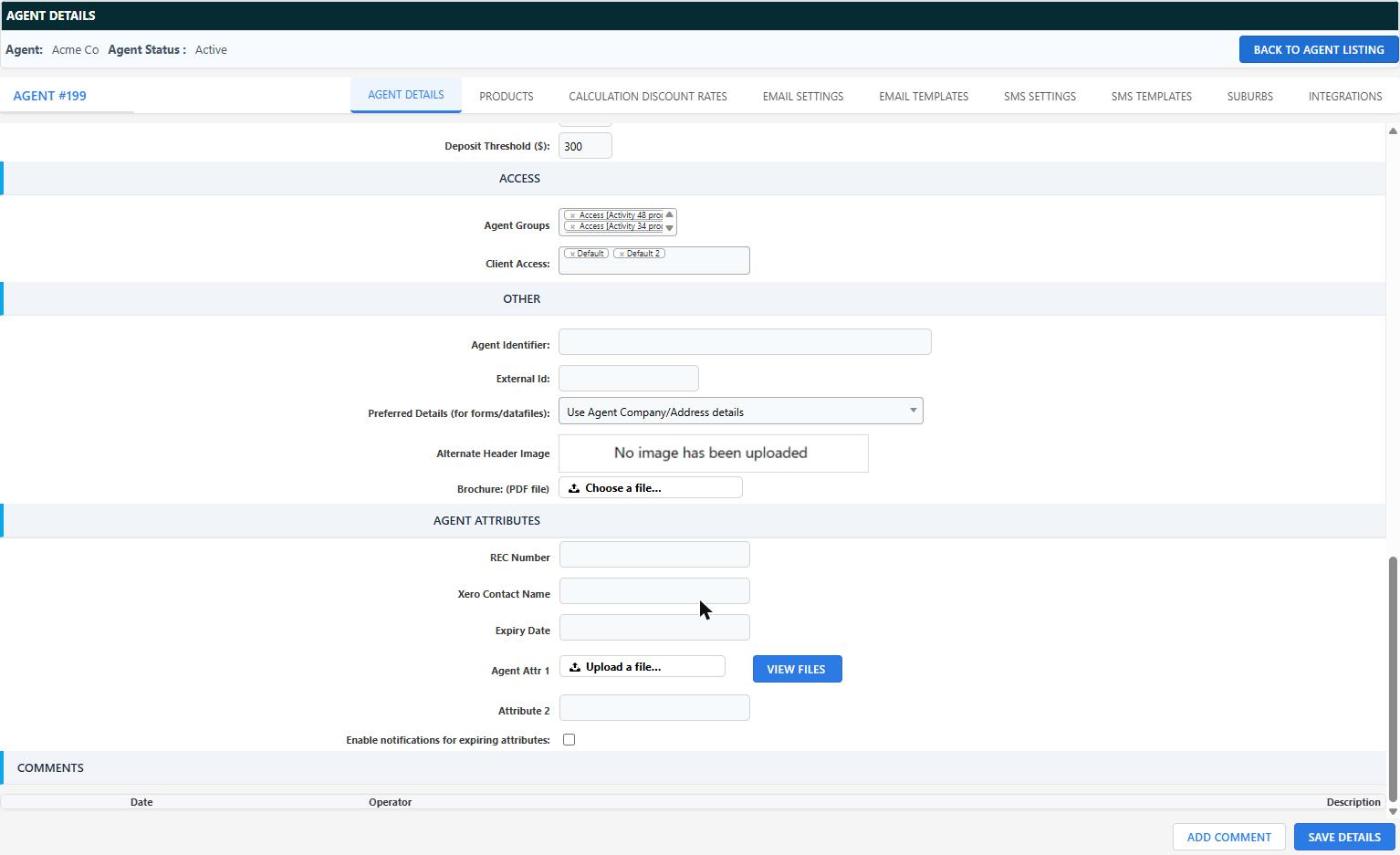
- In Step 6, select these two attributes in the integration settings.
When the attribute has a value, it is used as the Xero contact name instead of the default name. Records where the attribute is left blank keep using the default name.
Step 6 - Connect to Xero and enable the integration
-
Navigate to (Configuration icon) Integrations Integration Settings
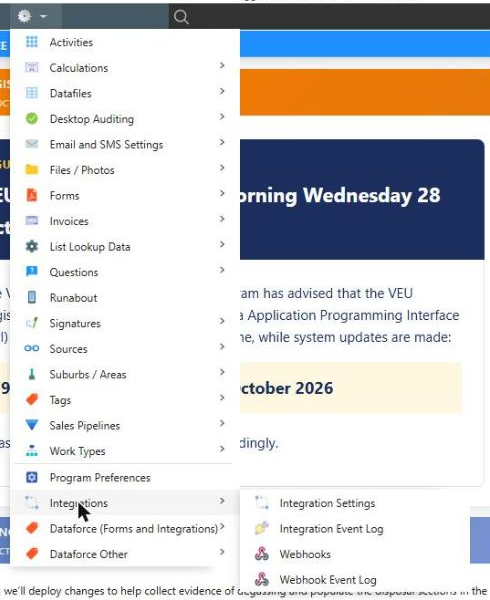
-
Click Configure on the Xero Accounting (Fieldworker/Agent Invoices) integration.
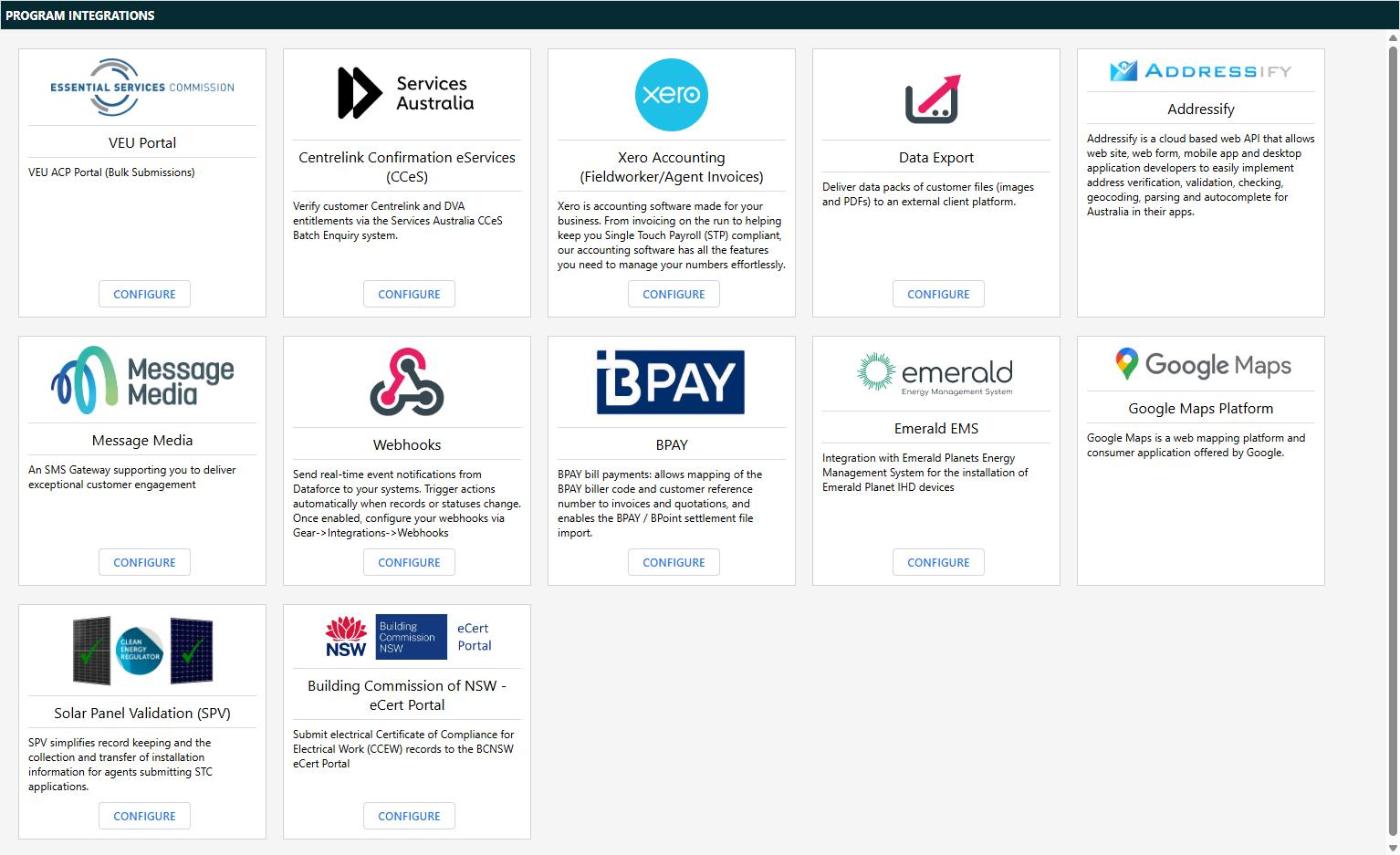
-
Click Connect.
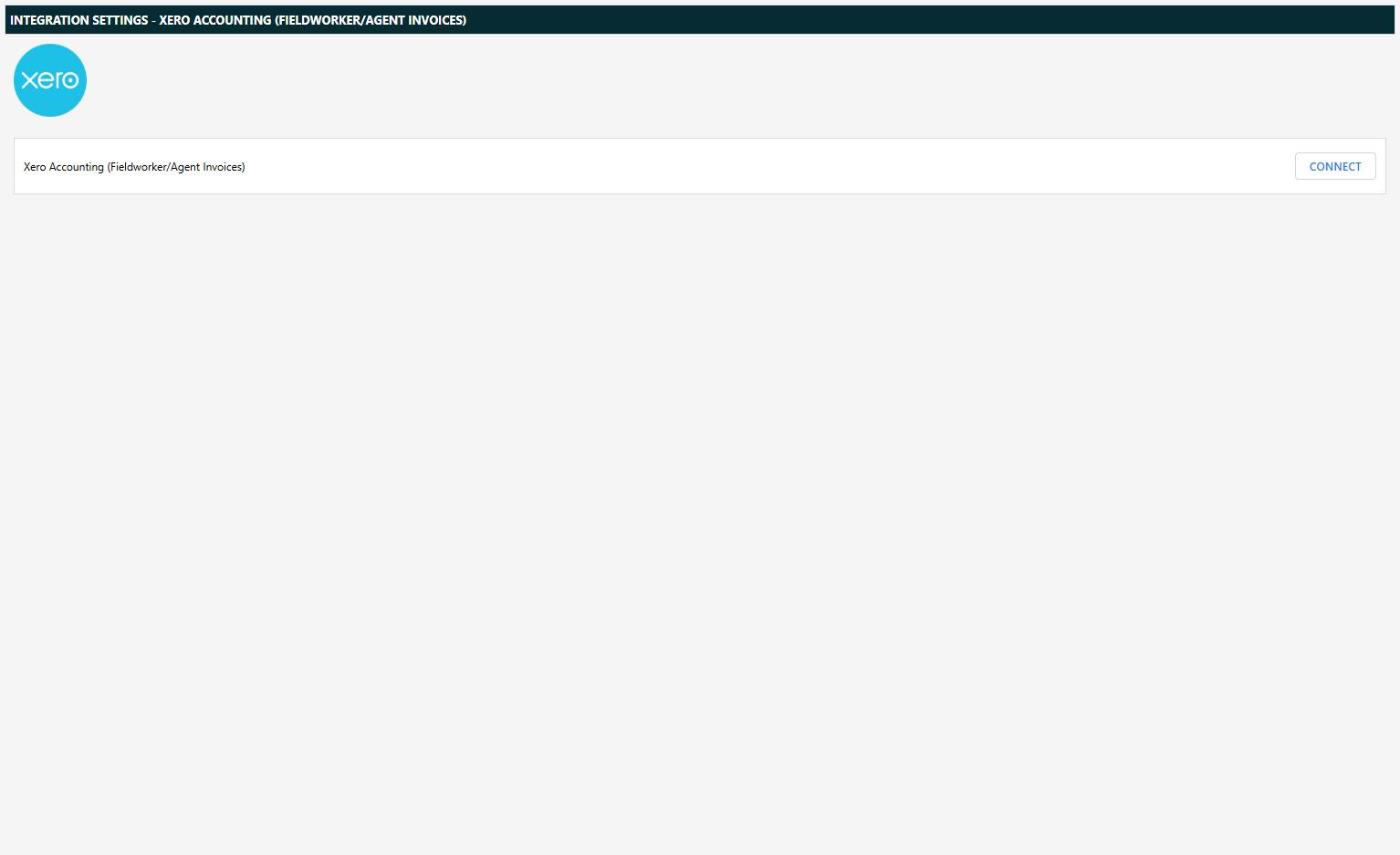
- A Xero window opens. Log in if prompted, choose the organisation you want to connect, and click Allow access. Dataforce ASAP asks Xero for permission to read your organisation settings and to create contacts and transactions.
-
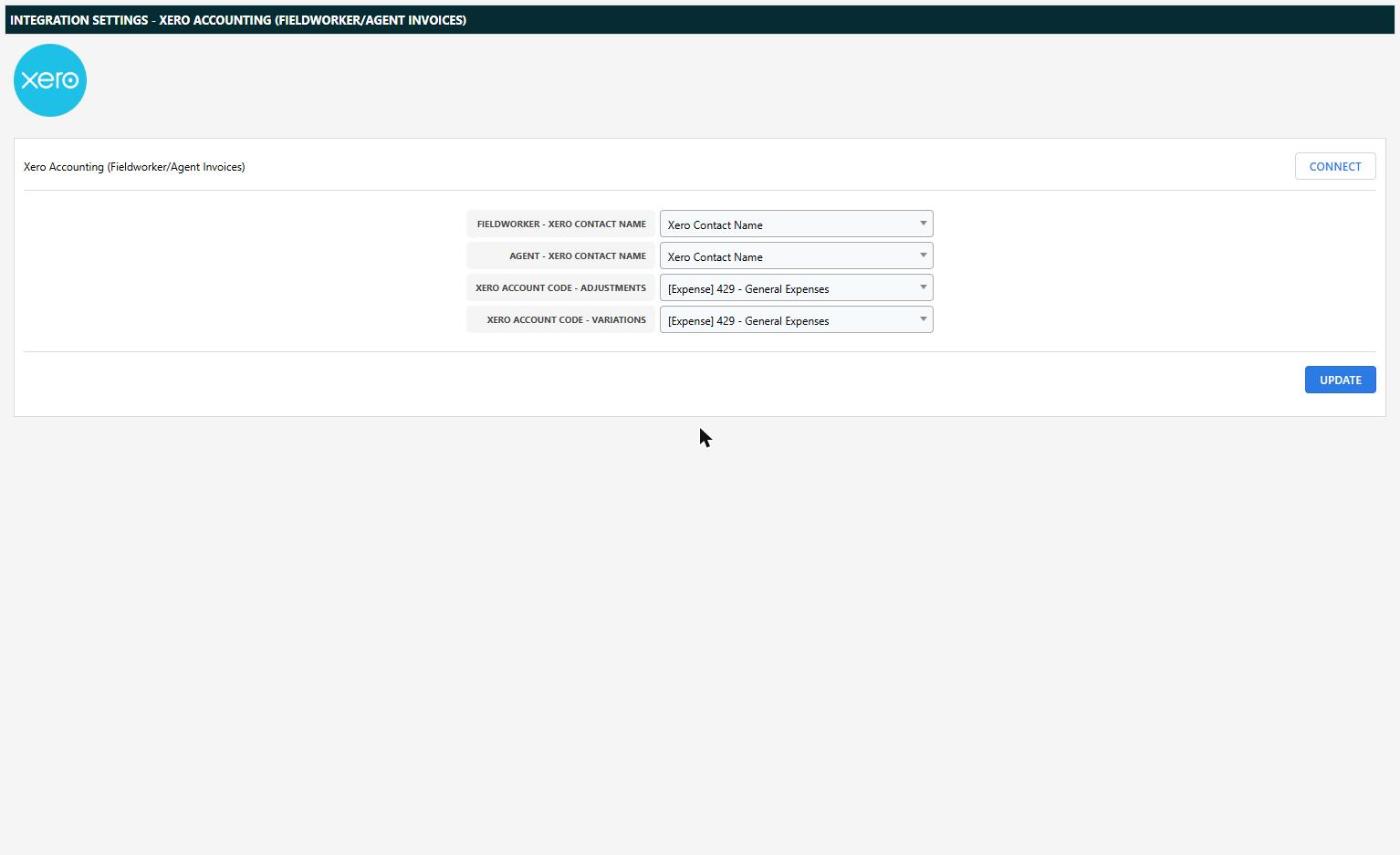
You are returned to Dataforce ASAP. The integration screen now shows the Enabled switch turned on and the integration settings below the connection bar.
-
Complete the settings:
Setting Description Fieldworker - Xero Contact Name The Field Worker Attribute that holds the Xero contact name (Step 5). Leave blank to always use the fieldworker’s company or personal name. Agent - Xero Contact Name The Agent Attribute that holds the Xero contact name (Step 5). Leave blank to always use the agent company name. Xero Account Code - Adjustments The Accounting Code used for the Adjustment amount entered on an invoice. Xero Account Code - Variations The Accounting Code used for the Manual Variations amount entered on an invoice. Variations raised through the Invoice Variations screen use the Accounting Code of their Variation Type instead. - Click Enable. The integration is now live: the button changes to Update and a Disconnect button appears next to the connection.
From now on, every fieldworker or agent invoice that is finalised is sent to Xero.
Changing the settings later
Open the integration again (Integration Settings Configure on Xero Accounting), change the settings and click Update. Changes apply to invoices finalised after the update.
Using the integration
Finalising an invoice
Finalise fieldworker and agent invoices exactly as before, from the Invoice View tab (see Invoice View Tab). Once the bill has been created, a Xero badge appears in the top right of the invoice showing its status in Xero:
| Badge | Meaning |
|---|---|
| DRAFT (orange) | The bill has been created in Xero and is waiting to be approved there. |
| AUTHORISED (green) | The bill has been approved in Xero. |
| VOIDED (red) | The bill has been voided in Xero. |
Click the badge to open the bill in Xero. The badge appears once the integration service has created the bill, which is normally within a minute of finalising; refresh the invoice if it has not appeared yet.
Reversing an invoice
Reversing an invoice in Dataforce ASAP sends a delete request to Xero. If the bill is still a draft it is deleted; if it has been approved it is voided. Re-finalising the invoice creates a new bill. If the bill has already been paid in Xero it cannot be voided, so remove the payment in Xero first.
Checking the Integration Event Log
Every event sent to Xero is recorded in the Integration Event Log.
- Navigate to (Configuration icon) Integrations Integration Event Log
- Filter by integration, status and date and click Search.
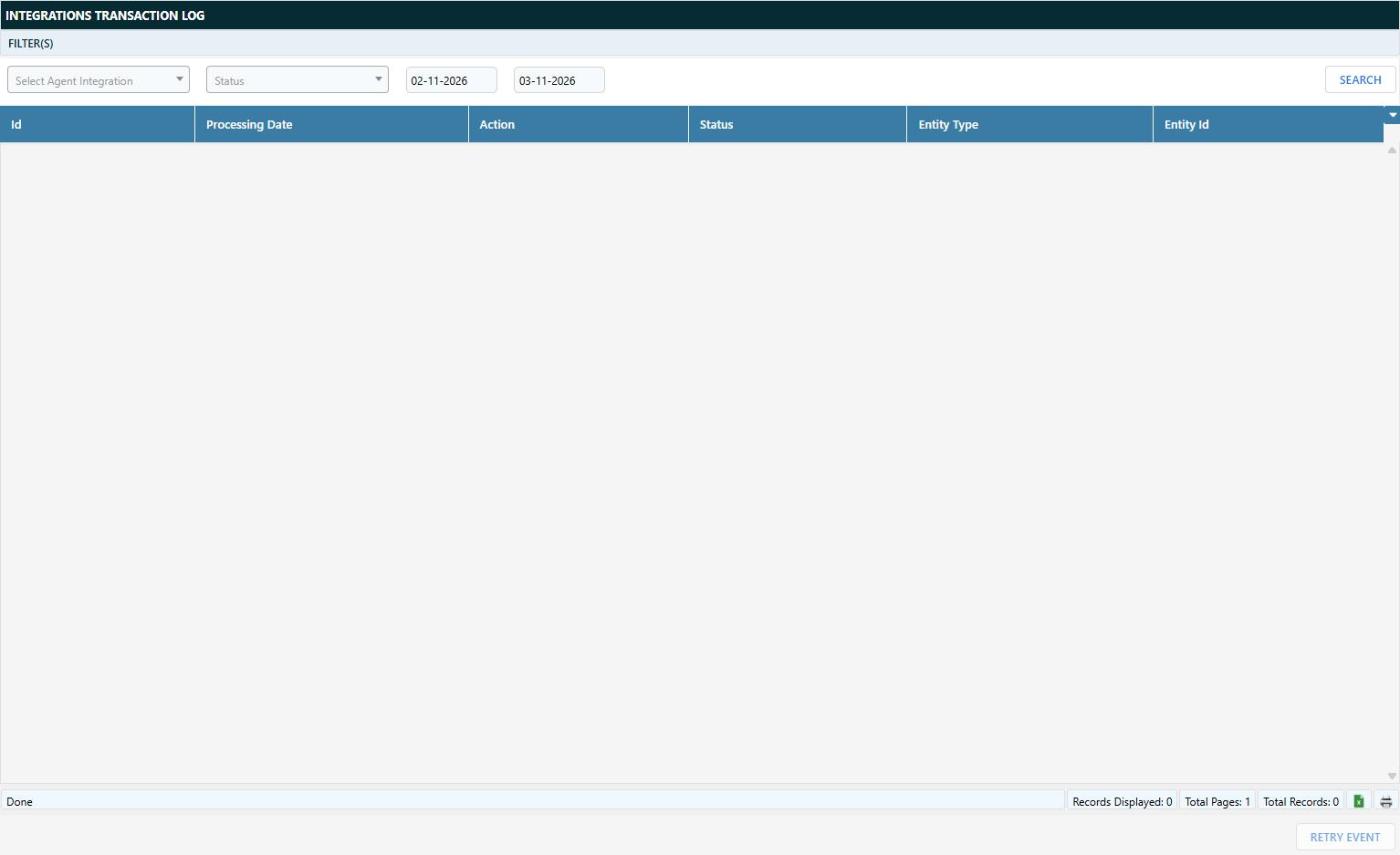
Each row shows the action (create or delete), the entity (invoice) and its status. If an event has failed, for example because an account code did not exist in Xero, fix the configuration, select the row and click Retry Event.
Disconnecting and reconnecting
To stop sending invoices to Xero, open the integration and click Disconnect (or switch Enabled off) and confirm. Invoices finalised while the integration is disconnected are not sent to Xero, and are not sent retrospectively when you reconnect, so enter them in Xero by hand.
To reconnect, click Connect again and authorise Xero as in Step 6. You must choose the same Xero organisation that was connected originally; choosing a different organisation fails with a connection mismatch error. Contact Dataforce support if you need to move the integration to a different Xero organisation.
You can also remove the connection from the Xero side under Settings Connected apps in Xero. If you do, reconnect from Dataforce ASAP as above.
Troubleshooting
| Symptom | What to check |
|---|---|
| No Xero badge appears on a finalised invoice. | Confirm the invoice type’s Invoice Stage is Field Worker Invoice, the integration shows as enabled, and check the Integration Event Log for a failed event. Allow a minute and refresh the invoice. |
| The bill was created against a new, duplicate contact in Xero. | The name sent from Dataforce ASAP did not match the Xero contact. Enter the exact Xero contact name in the fieldworker’s or agent’s Xero Contact Name attribute, then merge the duplicate contacts in Xero. |
| Event failed with an account code error. | The Accounting Code does not exist in the Xero chart of accounts, or the account is archived or does not allow purchases. Correct the Accounting Code and retry the event. |
| Event failed with an item or tracking error. | The Item Code, tracking category or tracking option name does not match Xero exactly. Correct the name in Dataforce ASAP or Xero and retry the event. |
| The bill in Xero has no GST, or GST on a line that should be GST free. | Check the Tax Code of the line’s Accounting Code and the GST Registered flag on the fieldworker or agent record. |
| The bill stays in Draft and cannot be approved in Xero. | One or more lines have no account code. Set an Accounting Code on the Invoice Line Item or Variation Type, and complete the account on the bill in Xero. |
| Clicking Connect does nothing, or the Xero page never returns to Dataforce ASAP. | Allow pop-ups from Dataforce ASAP in your browser, make sure you are logged in to Xero, and try again. |
| Invoices stopped being sent after a period of inactivity. | Xero drops app connections that have not been used for 60 days. Open the integration and click Connect to reconnect to the same organisation. |